デジタルマルチメータの測定データを継続的に記録したいと考えている。安価な無線機能のついたマルチメータとしてOWON B35(T)などがある。それを用いて、ロギングできるようにしたい。OWONから提供されているアプリケーションプログラムでは自由度が低く、思い通りのことができない。
そこでロギングの準備段階として、デジタルマルチメータの測定データをESP32で受信し、表示するプログラムを作って試した。
目次
情報ソース
OWONマルチメータのデータ転送方式とフォーマットの組み合わせは3種類あるようだ。
- Bluetooth 2.0のSPPプロトコルによって14バイトの測定データを送る
- Bluetooth Low Energy のGATTによって14バイトの測定データを送る
- Bluetooth Low Energy のGATTによって6バイトの測定データを送る
Bluetooth 2.0版
このバージョンを使うデジタルマルチメータからのデータは、Bluetooth 2.0はサポートしていないESP32では受信できない。しかし、Ts Digital Multi Meter Viewerで受信できるので、それを使うことができる。
OWON B35 / B35T をパソコンに接続する方法について
http://www.ts-software-jp.net/products/tsdmmview-connect-b35.html
Ts Digital Multi Meter ViewerによってWindows PCにデータを読み込み、表示することができる。
BLE 14バイト版
CR/LFを含めて14バイトで測定データが送られる。
Bluetooth Client for Owon B35 Multimeterによれば、Fortune Semiconductor FS9922 chipを使っているとのこと。
下にも示すESP32 M5Stack BLE client OWON B35T meterのプログラムなどを利用すれば受信できる。
Bluetooth Data Owon B35T Multimeter
https://hackaday.io/project/12922-bluetooth-data-owon-b35t-multimeter
データフォーマットも示されており、わかりやすい。
ESP32 M5Stack BLE client OWON B35T meter
https://github.com/reaper7/M5Stack_BLE_client_Owon_B35T
M5Stackを使って、OWON B35T のデータを表示したり、操作したりすることができる。
OWON B35 Mutltimeter data capture and display for Linux
https://github.com/inflex/owon-b35
Tools for accessing OWON multimeters like OWON B35T via BLE
https://github.com/akemnade/owon-tools
parse gatttool output to read data over bluetooth from the owon b35t multimeter
https://github.com/cransom/b35t-reader
BLE 6バイト版
6バイトで測定データが送信される。リトルエンディアンのバイトオーダーで16ビットデータが3組送られると考えた方が良い。
Bluetooth Client for Owon B35 Multimeterによれば、Semic CS7729CN-001 chipを使っているとのこと。
Bluetooth Client for Owon B35 Multimeter
https://github.com/DeanCording/owonb35
デジタルマルチメータ OWON B35T (+) のデータを BLE で読んでみました
http://izawa-web.com/owonb35t/owonb35t.html
BLE 6バイト版のESP32受信プログラム開発
BLE 14バイト版は M5Stack で動作するプログラムが既にあるので、受信だけを行うBLE 6バイト版を作成してみた。
ハードウェア環境
- MH-ET LIVE ESP32 MiniKit
- WEMOS Electronics (LoLin)のOLED Shield
- 64×48ピクセルOLEDディスプレイ
プログラム開発環境
- Windows 10
- PlatformIO IDE for VSCode
パーティションテーブルの指定については PlatformIO IDE for VSCode でESP32のプログラム開発の指定方法 を参照のこと。
必要な Arduino ライブラリ
下に示したスクリーンショットにも示されているが、以下のライブラリが必要。
Dependency Graph
|– <SPI> 1.0
|– <SparkFun Micro OLED Breakout>
| |– <Wire> 1.0
| |– <SPI> 1.0
|– <ArduinoLog> 1.0.2
|– <Wire> 1.0
|– <WiFi> 1.0
|– <ESP32 BLE Arduino> 0.4.16
<SparkFun Micro OLED Breakout>と<ArduinoLog>は手動でPlatformIO Homeのライブラリマネージャからインストールする必要がある。
他は自動的にインストールされるはず。
ライブラリのインストールについては PlatformIO IDE for VSCode へのArduinoライブラリのインストール を参照のこと。
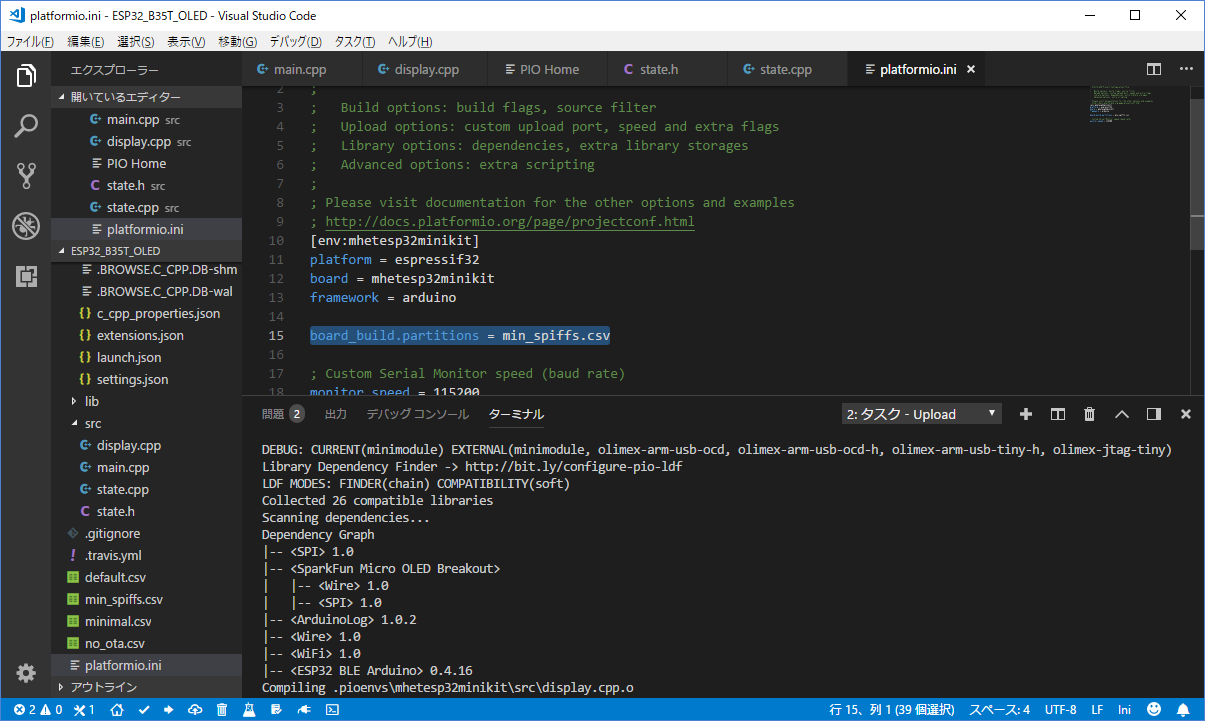
platformio.iniでのpartition tableの指定
デフォルトのままではESP32のフラッシュメモリのプログラム領域が不足して、プログラムをアップロードできない。このため、partition table を指定してプログラム領域を大きくする必要がある。パーティションテーブルの指定については PlatformIO IDE for VSCode におけるESP32 Partition Tableの指定方法 を参照のこと。
platformio.iniの例
[code highlight="6"]
[env:mhetesp32minikit]
platform = espressif32
board = mhetesp32minikit
framework = arduino
board_build.partitions = min_spiffs.csv
; Custom Serial Monitor speed (baud rate)
monitor_speed = 115200
[/code]
ソースプログラム
main.cpp
ESP32 M5Stack BLE client OWON B35T meter のコードを基に制御する部分などを取り除き、6バイトデータに対応するように修正している。
[code]
/*
Based on reaper7 M5Stack_BLE_client_Owon_B35T: https://github.com/reaper7/M5Stack_BLE_client_Owon_B35T
Modified by kunsen
*/
/*
* ————————————————————
* "THE BEERWARE LICENSE" (Revision 42):
* <Reaper7> wrote this code. As long as you retain this
* notice, you can do whatever you want with this stuff. If we
* meet someday, and you think this stuff is worth it, you can
* buy me a beer in return.
* ————————————————————
*/
#include <Arduino.h>
#include <WiFi.h>
#include <Wire.h>
#include <BLEDevice.h>
#include <BLEUtils.h>
#include <BLEScan.h>
#include <BLEAdvertisedDevice.h>
#include <ArduinoLog.h> // https://github.com/thijse/Arduino-Log/
#include "state.h"
#define LOGLEVEL LOG_LEVEL_NOTICE /* ArduinoLog */
//——————————————————————————
const char *OWON_NAME = "BDM"; // OWON device name
static BLEUUID serviceUUID("0000fff0-0000-1000-8000-00805f9b34fb"); // OWON service UUID
static BLEUUID charnotificationUUID("0000fff4-0000-1000-8000-00805f9b34fb"); // OWON notification characteristic UUID
//static BLEUUID charwriteUUID("0000fff3-0000-1000-8000-00805f9b34fb"); // OWON write characteristic UUID
//std::string targetAddressString("c8:fd:19:00:00:00"); // target multimeter mac address
//static BLEAddress *pTargetServerAddress = new BLEAddress(targetAddressString);
static BLEAddress *pServerAddress;
static BLERemoteCharacteristic *pRemoteCharacteristicNotify;
volatile boolean deviceBleConnected = false; // flag BLE conneted
static unsigned long bleLastNotifiedTime = 0; // timestamp "last received data from meter" in ms
static unsigned long bleScanStartTime = 0; // timestamp when ble scan is beginning in ms
typedef int InSecond;
const InSecond scanPeriod = 15; // BLE scan time in s
const int dataLength = 6;
extern void setupDisplay();
extern void display();
extern void displayConnected();
static void notifyCallback(BLERemoteCharacteristic *pBLERemoteCharacteristic,
uint8_t *pData, size_t length, bool isNotify)
{
Log.notice("notifyCallbacklength=%d, isNofity=%d\n", length, isNotify);
if (isNotify == true && length == dataLength
&& pBLERemoteCharacteristic->getUUID().equals(charnotificationUUID))
{
uint16_t first, secondWord, thirdWord;
// little endian
first = pData[1] << 8 | pData[0];
secondWord = pData[3] << 8 | pData[2];
thirdWord = pData[5] << 8 | pData[4];
save(first, secondWord, thirdWord);
bleLastNotifiedTime = millis();
}
}
class MyClientCallbacks : public BLEClientCallbacks
{
void onConnect(BLEClient *pClient)
{
deviceBleConnected = true; // set ble connected flag
Log.notice("%s connected\n", OWON_NAME);
setConnected(true);
}
void onDisconnect(BLEClient *pClient)
{
pClient->disconnect();
deviceBleConnected = false; // clear ble connected flag
Log.notice("%s disconnected\n", OWON_NAME);
setConnected(false);
}
};
bool connectToServer(BLEAddress pAddress)
{
Log.notice("Create a connection to addr: %s\n", pAddress.toString().c_str());
BLEClient *pClient = BLEDevice::createClient();
Log.notice(" – Client created\n");
pClient->setClientCallbacks(new MyClientCallbacks());
Log.notice(" – Connecting to server…\n");
pClient->connect(pAddress); // connect to the remove BLE Server.
BLERemoteService *pRemoteService = pClient->getService(serviceUUID); // check if remote BLE service exists
if (pRemoteService == nullptr)
{
Log.notice(" – Service not found (UUID: %s)\n", serviceUUID.toString().c_str());
return false;
}
else
{
Log.notice(" – Service found (UUID: %s)\n", serviceUUID.toString().c_str());
}
// notify characteristic
pRemoteCharacteristicNotify = pRemoteService->getCharacteristic(charnotificationUUID);
if (pRemoteCharacteristicNotify == nullptr)
{
Log.notice(" – Notify characteristic not found (UUID: %s)\n", charnotificationUUID.toString().c_str());
return false;
}
else
{
Log.notice(" – Notify characteristic found (UUID: %s)\n", charnotificationUUID.toString().c_str());
}
pRemoteCharacteristicNotify->registerForNotify(notifyCallback); //register notify callback
return true;
}
class MyAdvertisedDeviceCallbacks : public BLEAdvertisedDeviceCallbacks
{
void onResult(BLEAdvertisedDevice advertisedDevice)
{
Log.notice("BLE scan stop\n");
if (advertisedDevice.haveName()
// && advertisedDevice.getAddress().equals(*pTargetServerAddress)
&& strcmp(advertisedDevice.getName().c_str(), OWON_NAME) == 0)
{
advertisedDevice.getScan()->stop();
Log.notice("Stop BLE scan\n");
pServerAddress = new BLEAddress(advertisedDevice.getAddress());
Log.notice("BLE device found (%s at addr: %s)\n", OWON_NAME, pServerAddress->toString().c_str());
}
else
{
Log.notice("BLE device not found\n");
}
}
};
void doScan()
{
Log.notice("BLE scan start\n");
bleScanStartTime = millis();
BLEScan *pBLEScan = BLEDevice::getScan();
pBLEScan->setAdvertisedDeviceCallbacks(new MyAdvertisedDeviceCallbacks());
pBLEScan->setActiveScan(true);
pBLEScan->start(scanPeriod);
}
void setup()
{
Serial.begin(115200);
Log.begin(LOGLEVEL, &Serial);
Log.notice("Start OWON B35T Client\n");
Wire.begin();
WiFi.persistent(false);
WiFi.enableSTA(false);
WiFi.enableAP(false);
WiFi.mode(WIFI_OFF);
setupDisplay();
BLEDevice::init("");
}
void loop()
{
if (deviceBleConnected == false)
{
delay(100);
if (bleScanStartTime != 0 && millis() > (bleScanStartTime + (scanPeriod * 1000)))
{
bleScanStartTime = 0;
return;
}
displayConnected();
if (bleScanStartTime == 0)
{
doScan();
return;
}
bleScanStartTime = 0;
if (connectToServer(*pServerAddress))
{
bleLastNotifiedTime = millis();
}
}
display();
}
[/code]
display.cpp
OLEDディスプレイの制御
[code]
#include <Arduino.h>
#include <ArduinoLog.h> // https://github.com/thijse/Arduino-Log/
#include <Wire.h> // Include Wire if you're using I2C
#include <SPI.h> // Include SPI if you're using SPI
#include <SFE_MicroOLED.h> // Include the SFE_MicroOLED library
#include "state.h"
#define LOGLEVEL LOG_LEVEL_NOTICE /* ArduinoLog */
#define BUF_SIZE 16
//////////////////////////
// MicroOLED Definition //
//////////////////////////
#define PIN_RESET 255 // No RST pin
#define DC_JUMPER 0
//////////////////////////////////
// MicroOLED Object Declaration //
//////////////////////////////////
MicroOLED oled(PIN_RESET, DC_JUMPER); // I2C declaration
void setupDisplay()
{
oled.begin(); // Initialize the OLED
oled.clear(ALL); // Clear the display's internal memory
oled.display(); // Display what's in the buffer (splashscreen)
delay(1000); // Delay 1000 ms
oled.clear(PAGE); // Clear the buffer.
}
// Outputs the measurement units
void displayUnit(int scale, int func)
{
char unitString[BUF_SIZE];
static const char* scaleStrings[8] = {
"?0", "n", "u", "m", " ", "k", "M", "?7"
};
static const char* funcStrings[16] = {
"V dc", "V ac", "A dc", "A ac", "Ohms", "F", "Hz", "%",
"°C", "°F", "V", "Ohms", "hFE", "?D", "?E", "?F"
};
sprintf(unitString, "%s%s", scaleStrings[scale], funcStrings[func]);
oled.setFontType(1); // Set font to type 1 8×16.
oled.setCursor(16, 32);
oled.print(unitString);
}
void displayValue(int sign, int value, int decimal)
{
char valueString[BUF_SIZE];
float divider = pow(10.0, (float)decimal);
float fval = (sign ? -1 : 1) * value / divider;
sprintf(valueString, "%6f", fval);
valueString[7] = 0; // limit length
Log.notice("fval=%s\n", valueString);
// oled.setFontType(2); // 7-segment font
oled.setFontType(1); // Set font to type 1
oled.setCursor(0, 16);
oled.print(valueString);
}
void displayFlags(int flags)
{
char flagString[BUF_SIZE];
bool hold = (flags >> 0) & 1;
bool delta = (flags >> 1) & 1;
bool autorange = (flags >> 2) & 1;
bool lowbattery = (flags >> 3) & 1;
bool min = (flags >> 4) & 1;
bool max = (flags >> 5) & 1;
Log.notice(
"hold=%d, delta=%d, autorange=%d, lowbattery=%d, min=%d, max=%d\n",
hold, delta, autorange, lowbattery, min, max);
sprintf(flagString, "%s%s%s%s%s%s",
(hold ? "H" : " "),
(delta ? "d" : " "),
(autorange ? "a" : " "),
(lowbattery ? "_" : " "),
(min ? "m" : " "),
(max ? "M" : " "));
oled.setFontType(1); // Set font to type 1. 8×16.
oled.setCursor(0, 0);
oled.print(flagString);
}
void displayConnected()
{
oled.clear(PAGE); // Clear the screen
oled.setFontType(1); // Set font to type 1. 8×16.
oled.setCursor(0, 0);
if ( !isConnected() ) oled.print("Not Connected.");
oled.display();
}
int lastCount;
bool lastConnected;
void display()
{
bool connected = isConnected();
if (connected != lastConnected)
{
Log.notice("connected=%d, lastConnected=%d\n", connected, lastConnected);
displayConnected(); // clear display and show disconnected status
lastConnected = connected;
}
int count = getCount();
if (count == lastCount) {
return; // no new data
}
lastCount = count;
// https://github.com/DeanCording/owonb35
int funcs = getFuncs();
int func = (funcs >> 6) & 0xf;
int scale = (funcs >> 3) & 0x7;
int decimal = (funcs >> 0) & 0x7;
int values = getValues();
bool sign = (values & 0x8000) ? 1 : 0;
int value = values & 0x7fff;
Log.notice("func=%d, scale=%d, decimal=%d, sign=%d, value=%d\n",
func, scale, decimal, sign, value);
oled.clear(PAGE); // Clear the screen
displayFlags(getFlags());
displayValue(sign, value, decimal);
displayUnit(scale, func);
oled.display(); // Draw on the screen
}
[/code]
state.h
BLEで受信したデータの管理用
[code]
extern void save(int funcs, int flags, int values);
extern void setConnected(bool on);
bool isConnected();
extern int getFuncs();
extern int getFlags();
extern int getValues();
extern void updateCount();
extern int getCount();
[/code]
state.cpp
BLEで受信したデータの管理用
[code]
#include "state.h"
int funcs;
int flags;
int values;
bool connected;
int count;
void save(int first, int second, int third)
{
funcs = first;
flags = second;
values = third;
updateCount();
}
void setConnected(bool on) {
connected = on;
}
bool isConnected() {
return connected;
}
int getFuncs()
{
return funcs;
}
int getFlags()
{
return flags;
}
int getValues()
{
return values;
}
void updateCount()
{
count++;
}
int getCount()
{
return count;
}
[/code]
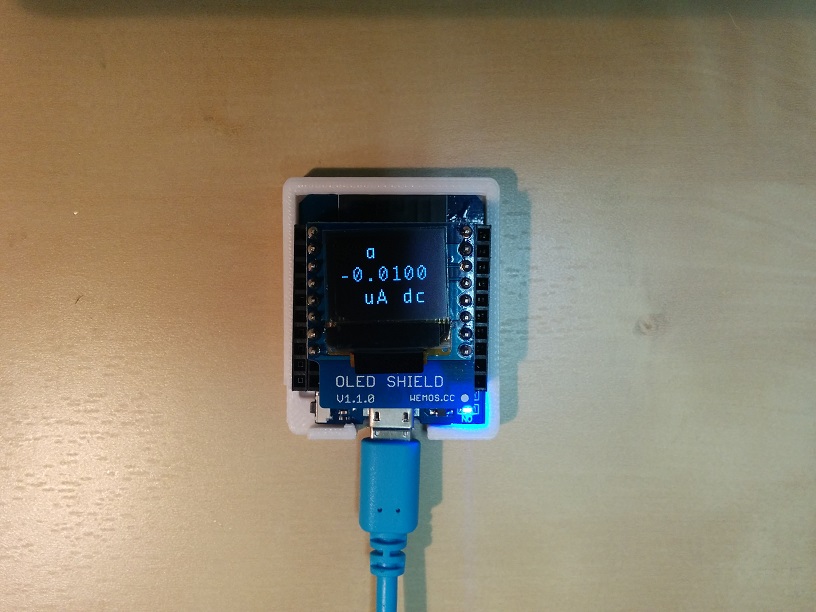
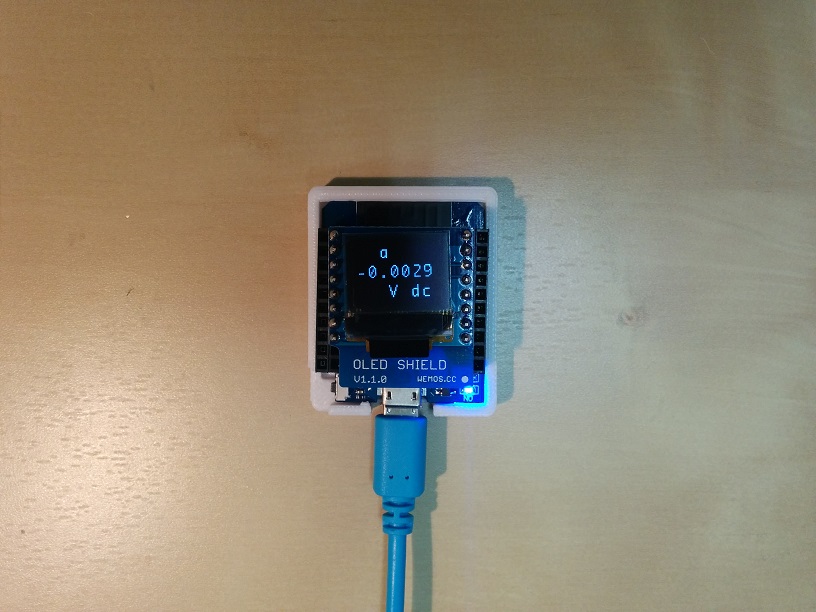
実行例
実行させると以下のように表示される。

まとめと今後
プログラムはとりあえず動作させることを目的にしてテストもほとんどしていないので、多数の誤りがあるかもしれない。
時間があれば、受信したデータのフォーマットをBluetooth 2.0版に変換してシリアルに出力することで Ts Digital Multi Meter Viewer などでロギングすることを試したい。