M5Stack Core 2 で ESPHome を使えるように設定のYAMLファイルを作って試してみた。おおむね動作するが不具合もある。
電源管理(AXP192)やタッチスクリーン(FT6336U)のライブラリが安定していない。ライブラリが近い将来に改善されることを期待したい。改善後にテストを再開できるように、執筆時点の備忘録として記録を残しておく。
AXP192に関しては、Support for ILI9342C display (M5 stack Core 2 display) #1076 を参考にした。
目次
まとめ
ディスプレイは、電源投入した直後は正しく表示されないことがある。リセットボタンを押してリセットすることでおおむね正しく表示される。
タッチスクリーンにbinary_sensor を設定してボタンとして使用しても、最初のイベントや押した際のイベントの発生が、物理ボタンと同じ想定した通りに動作しない。
i2sオーディオの使い方は十分にテストしていない。
Bluetooth Low Energy (BLE)などの無線系のテストはしていない。
試用環境
ハードウェア
ソフトウェア
- Windows 11 Pro 22H2 22621.1555
- CP210x Universal Windows Driver v11.2.0 (10/21/2022)
- Home Assistant 2023.5.2 (Supervisor 2023.04.1, Operating System 10.1, フロントエンド: 20230503.3)
- ESPHome version: 2023.4.4
設定手順
初期の設定手順は、M5Stack GrayでESPHomeを使うための設定と基本的に同じなので省略する。ただし、ファームウェアのビルド時にPINに関する次の警告が出る。
|
1 2 3 4 5 6 7 8 9 10 11 12 |
WARNING GPIO0 is a Strapping PIN and should be avoided. Attaching external pullup/down resistors to strapping pins can cause unexpected failures. See https://esphome.io/guides/faq.html#why-am-i-getting-a-warning-about-strapping-pins WARNING GPIO12 is a Strapping PIN and should be avoided. Attaching external pullup/down resistors to strapping pins can cause unexpected failures. See https://esphome.io/guides/faq.html#why-am-i-getting-a-warning-about-strapping-pins WARNING GPIO2 is a Strapping PIN and should be avoided. Attaching external pullup/down resistors to strapping pins can cause unexpected failures. See https://esphome.io/guides/faq.html#why-am-i-getting-a-warning-about-strapping-pins WARNING GPIO15 is a Strapping PIN and should be avoided. Attaching external pullup/down resistors to strapping pins can cause unexpected failures. See https://esphome.io/guides/faq.html#why-am-i-getting-a-warning-about-strapping-pins |
表示・センサーをテストするYAML
ディスプレイやM5Stack Core 2に内蔵されているセンサーなどのテストしたYAMLファイルを以下に示す。ハイライトされた行は、M5Stack Core 2 を登録した際の情報を使うか、自前のものに書き換える必要がある。
|
1 2 3 4 5 6 7 8 9 10 11 12 13 14 15 16 17 18 19 20 21 22 23 24 25 26 27 28 29 30 31 32 33 34 35 36 37 38 39 40 41 42 43 44 45 46 47 48 49 50 51 52 53 54 55 56 57 58 59 60 61 62 63 64 65 66 67 68 69 70 71 72 73 74 75 76 77 78 79 80 81 82 83 84 85 86 87 88 89 90 91 92 93 94 95 96 97 98 99 100 101 102 103 104 105 106 107 108 109 110 111 112 113 114 115 116 117 118 119 120 121 122 123 124 125 126 127 128 129 130 131 132 133 134 135 136 137 138 139 140 141 142 143 144 145 146 147 148 149 150 151 152 153 154 155 156 157 158 159 160 161 162 163 164 165 166 167 168 169 170 171 172 173 174 175 176 177 178 179 180 181 182 183 184 185 186 187 188 189 190 191 192 193 194 195 196 197 198 199 200 201 202 203 204 205 206 207 208 209 210 211 212 213 214 215 216 217 218 219 220 221 222 223 224 |
substitutions: _friendly_name: "ESPHome Web c472e8 Core2" esphome: name: esphome-web-c472e8 friendly_name: $_friendly_name esp32: board: m5stack-core2 framework: type: arduino # Enable logging logger: level: DEBUG # NONE, ERROR, WARN, INFO, DEBUG(default), VERBOSE, or VERY_VERBOSE # Enable Home Assistant API api: encryption: key: "3cPrfDCNEwoSp0PruIEDj7ZAd32d1jpQEY7QRUGWshw=" # Enable OTA (Over-The-Air) ota: password: "425d9c613a41cf82cef195af8cdc539f" # WiFi Access Point wifi: ssid: !secret wifi_ssid password: !secret wifi_password # Enable fallback hotspot (captive portal) in case wifi connection fails ap: ssid: "Esphome-Web-C472E8" password: "TnNALZ7GZD29" # Fallback mechanism when WiFi Access Point cannot be connected to captive_portal: # External component libraries external_components: - source: github://rvinke/esphome-axp192 # AXP192 Power Management Chip # as of 2023/May/07 components: [axp192] refresh: always - source: github://gpambrozio/esphome@FT6336U-touch # Capacitive Touch Panel Controller components: [ ft63x6 ] - source: github://TomG736/esphome-BM8563 # Real-time Clocks (RTC) components: [ bm8563 ] i2s_audio: # M5Stack Core 2 i2s_lrclk_pin: GPIO0 i2s_bclk_pin: GPIO12 media_player: # player platform: i2s_audio name: ESPHome I2S Media Player dac_type: external i2s_dout_pin: GPIO2 mode: mono microphone: # microphone (requires i2s_audio, and needed for voice_assistant) - platform: i2s_audio id: mic_id i2s_din_pin: GPIO34 #voice_assistant: # voice assistant (requires microphone) # microphone: mic_id # on_stt_end: # then: # - lambda: |- # ESP_LOGD("voice_assistant", "Speech-to-text: %s", x); # I2C (Inter-Integrated Circuit) setting i2c: # M5Stack Core2 - id: i2c_bus sda: GPIO21 scl: GPIO22 scan: True touchscreen: # M5Stack Core2 - platform: ft63x6 i2c_id: i2c_bus on_touch: - logger.log: format: Touch at (%d, %d) args: [touch.x, touch.y] binary_sensor: # M5Stack Core2 - platform: touchscreen name: ButtonA # touch sensor button x_min: 0 x_max: 100 y_min: 120 y_max: 140 filters: - invert: on_press: then: - display.page.show_previous: core2_display - platform: touchscreen name: ButtonB # touch sensor button x_min: 110 x_max: 210 y_min: 120 y_max: 140 filters: - invert: on_press: then: - display.page.show: page1 on_release: then: - media_player.play_media: 'https://taira-komori.jpn.org/sound/game01/jump01.mp3' # requires i2s_audio, media_player - platform: touchscreen name: ButtonC # touch sensor button x_min: 220 x_max: 320 y_min: 120 y_max: 140 filters: - invert: on_press: then: - display.page.show_next: core2_display # - platform: touchscreen # name: VoiceAssistantButton # button for voice assistant # x_min: 110 # x_max: 210 # y_min: 40 # y_max: 80 # filters: # - invert: # on_press: # - voice_assistant.start: # on_release: # - voice_assistant.stop: # Fonts (needed for text display) font: - file: "gfonts://Roboto" id: roboto48 size: 48 - file: "gfonts://Roboto" id: roboto32 size: 32 - file: "gfonts://Roboto" id: roboto14 size: 14 # QR Code generation (used in sample display) qr_code: - id: friendly_name_qr value: $_friendly_name # SPI(Serial Peripheral Interface) setting (needed for display) spi: # M5Stack Core2 clk_pin: GPIO18 mosi_pin: GPIO23 miso_pin: GPIO38 # Display for M5Stack Core 2 (ILI9342C) display: # M5Stack Core 2 - platform: ili9xxx #model: M5CORE model: M5STACK cs_pin: GPIO5 dc_pin: GPIO15 #rotation: 0 id: core2_display # pages: - id: page0 lambda: |- Color COLOR_BLACK(0,0,0); Color COLOR_RED(255,0,0); Color COLOR_GREEN(0,255,0); Color COLOR_BLUE(0,0,255); Color COLOR_WHITE(255,255,255); auto margin = 30; it.fill(COLOR_RED); it.line(50, 10, it.get_height(), it.get_width(), COLOR_GREEN); it.line(0, it.get_height(), it.get_width(), 0, COLOR_WHITE); it.rectangle(0+margin, 0+margin, it.get_width()-2*margin, it.get_height()-2*margin, COLOR_BLUE); it.rectangle(20, 50, 30, 30, COLOR_RED); it.print(10, 10, id(roboto14), COLOR_GREEN, TextAlign::TOP_LEFT, "$_friendly_name"); it.print(20, 50, id(roboto48), COLOR_WHITE, TextAlign::TOP_LEFT, "Hello World!"); - id: page1 lambda: |- // Draw the QR-code at position [x=50,y=50] with white color and a 5x scale it.qr_code(50, 50, id(friendly_name_qr), Color(255,255,255), 5); - id: page2 lambda: |- // Draw a circle in the middle of the display it.filled_circle(it.get_width() / 2, it.get_height() / 2, 50); it.strftime(5, 15, id(roboto32), "%Y-%m-%d %H:%M:%S", id(esptime).now()); # Sensors sensor: - platform: axp192 # AXP192 Power Management model: M5CORE2 # M5Stack Core 2 i2c_id: i2c_bus address: 0x34 update_interval: 30s brightness: 75% # display brightness battery_level: name: "Battery Level" id: "m5core2_batterylevel" - platform: mpu6886 # 6 DoFs acceleration sensor address: 0x68 id: accel_6dof - platform: wifi_signal # WiFi signal name: WiFi Signal id: wifi_dbm - platform: uptime # System Uptime name: Uptime id: uptime_sec # Current Time time: - platform: homeassistant id: esptime |
外部コンポーネントライブラリ
先に書いたように、AXP192 や FT6336Uのコンポーネントのライブラリは、まだ、ESPHomeに正式には取り込まれていないので、external_components で指定する必要がある。
AXP192の他のバージョンの古いライブラリだとバイブレータが動作しっぱなしになる。
i2s Audio 関係
i2s による入出力を扱うために、i2s_audio を設定する必要がある。
i2s 出力を使う例としては、media_player がある。上記のYAMLでは、スクリーン下側中央のボタンをリリースした際に、Web上にあるMP3ファイルを再生している。MP3ファイルには、無料効果音で遊ぼう!のサイトを参照させていただいているが、他のものやローカルファイルに変更した方がよい。
また、Home Assistant のダッシュボードなどに表示される MediaPlayer でLocal Media ファイルやRadio Browserでインターネットラジオ、Text to Speech で音声合成をすると、M5Stack Core 2 のスピーカから音声を出すことができる。しかし、今回使った YAMLファイルのままでは、ブツブツと途切れた再生音になる。
i2s 入力を使う例としては、microphone があるが、簡単にその機能を試すコンポーネントがまだない。voice_assistant が i2s の microphone を使うが、Speech-to-Textエンジンですぐに使えるものがないようなので、動作を確認することができなかった。microphone はどのように使えるのか現時点でははっきりしない。ESPHomeのWebでは、今年は、Voice の年とあり、進展を期待したい。
タッチスクリーンとボタン
touchscreen は FT6336U 用の外部コンポーネントライブラリ ft63x6 である程度使える。ディスプレイの下のボタン領域に binary_sensor を設定することで、ボタンとしておおむね使うことができる。
画面下側のボタン領域左側をタッチするとdisplay の前のページが描画される。ボタン領域中央部をタッチすると display の page1 のQRコードが描画され、ボタンのリリース時に media_player で音を出すようにしている。ボタン領域右側をタッチすると次のページが描画される。
後で述べるように 押した際に発生すべきイベントが、リリースの直前に発生する問題が、執筆時点ではある。また、タッチの際に、触れていない領域のボタンの状態がonになる問題もある。執筆時点では、実用的なタッチスクリーンを使ったアプリの開発は難しい感じである。
voice_assistantを有効にするボタンを画面中央に設定することをしてみたが、on_press が on_releaseの直前にしか発生しないのでうまく使えないため、コメントアウトしてある。
座標
display と touchscreen で座標が縦方向の座標が異なる。
displayでは、x,yの範囲が(0,0)からサイズ(320,280)になっている。
touchscreen では、x,yの範囲が(0,0)からサイズ(320, 140)であり、(0,0)からサイズ(320,120)がdisplayの範囲に相当するようである。ディスプレイの下側のボタンの領域は(0,120)からサイズ(320,140)になっているようだ。明確な仕様は ESPHomeでは見つからなかった。
on_press
利用しているライブラリでは、binary_sensor の on_press が タッチをやめた後でないと発生しない。タッチをやめた際に、on_press、on_release が連続して発生する。重複してtrigger を起動しない判定が誤っているように思われる。
ちなみに、M5Stack Gray の物理ボタンの場合には binary_sensor の on_press はボタンを押した際に正しく起動される。
ディスプレイ関係
フォント
Google Fonts を利用する場合には、gfonts: を利用した簡略した形で指定できるようになっている。
QR コード
qr_code は図形の表示のサンプルとして使っている。
display
displayの指定は、おおむねM5Stack GrayでESPHomeを使うための設定と同じである。model: に M5CORE も指定できるようだが、表示が正しく表示されないようなので、M5STACKを利用している。
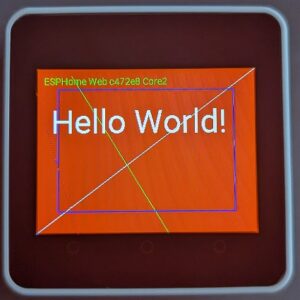
page0は、線とテキスト描画のテストがされる。
page1は、friendly_name を含むQRコードが描画される。
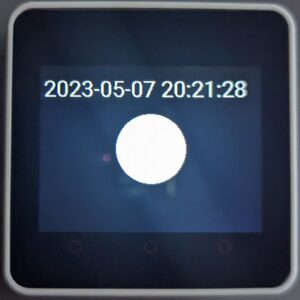
page2は、円と現在時刻が表示される。現在時刻を参照するために time: platform: homeassistant id: esptime を利用している。
表示は以下のようになる。


センサー
電源管理 axp192
バックライトの明るさ brightness は、ここで指定する。
バッテリのレベルを報告することができる。ログには、DEBUGレベル以上で次のような形式で出力されている。
axp192を設定するためには、i2c の設定が必要である。
|
1 2 |
[18:11:52][D][axp192.sensor:031]: Got Battery Level=106.572716 (4.172300) [18:11:52][D][sensor:110]: 'Battery Level': Sending state 100.00000 % with 1 decimals of accuracy |
6軸加速度センサー mpu6886
M5Stack GrayでESPHomeを使うための設定 とは異なり、加速度の個々のデータは出力しないようにしているため、Home Assistantのダッシュボードで加速度を見ることはできない。ただし、ログには、DEBUGレベル以上で次のような形式で出力されている。
mpu6886を設定するためには、i2c の設定が必要である。
|
1 |
[18:12:19][D][mpu6886:128]: Got accel={x=-0.139 m/s², y=-0.196 m/s², z=10.557 m/s²}, gyro={x=-17.988 °/s, y=-7.012 °/s, z=6.463 °/s}, temp=39.394°C |
WiFi信号強度 wifi_signal
加速度と同様に、DEBUGレベル以上でログに次の形式で出力される。
|
1 |
[18:12:01][D][sensor:110]: 'WiFi Signal': Sending state -49.00000 dBm with 0 decimals of accuracy |
動作時間 uptime
加速度、WiFi信号強度と同様に、DEBUGレベル以上でログに次の形式で出力される。
|
1 |
[18:12:12][D][sensor:110]: 'Uptime': Sending state 51.08600 s with 0 decimals of accuracy |
現在時刻 time
page2で時刻表示をするために time: を設定している。
その他
様々な機能を追加しているので、ROMサイズの問題から BLE を含めることができない。BLEを含める場合には、YAMLから機能を削除する必要がある。
ログのデバッグ出力
ボタン操作を行わない場合の、リセット後のログ出力は以下のようであった。
|
1 2 3 4 5 6 7 8 9 10 11 12 13 14 15 16 17 18 19 20 21 22 23 24 25 26 27 28 29 30 31 32 33 34 35 36 37 38 39 40 41 42 43 44 45 46 47 48 49 50 51 52 53 54 55 56 57 58 59 60 61 62 63 64 65 66 67 68 69 70 71 72 73 74 75 76 77 78 79 80 81 82 83 84 85 86 87 88 89 90 91 92 93 94 95 96 97 98 99 100 101 102 103 104 105 |
INFO Successfully connected to esphome-web-c472e8.local [18:11:32][I][app:102]: ESPHome version 2023.4.4 compiled on May 7 2023, 18:10:59 [18:11:32][C][wifi:505]: WiFi: [18:11:32][C][wifi:363]: Local MAC: B8:F0:09:C4:72:E8 [18:11:32][C][wifi:364]: SSID: [redacted] [18:11:32][C][wifi:365]: IP Address: 192.168.8.177 [18:11:32][C][wifi:367]: BSSID: [redacted] [18:11:32][C][wifi:368]: Hostname: 'esphome-web-c472e8' [18:11:32][C][wifi:370]: Signal strength: -50 dB ▂▄▆█ [18:11:32][C][wifi:374]: Channel: 6 [18:11:32][C][wifi:375]: Subnet: 255.255.255.0 [18:11:32][C][wifi:376]: Gateway: 192.168.8.1 [18:11:32][C][wifi:377]: DNS1: 192.168.8.1 [18:11:32][C][wifi:378]: DNS2: 0.0.0.0 [18:11:32][C][logger:294]: Logger: [18:11:32][C][logger:295]: Level: DEBUG [18:11:32][C][logger:296]: Log Baud Rate: 115200 [18:11:32][C][logger:297]: Hardware UART: UART0 [18:11:32][C][i2c.arduino:053]: I2C Bus: [18:11:32][C][i2c.arduino:054]: SDA Pin: GPIO21 [18:11:32][C][i2c.arduino:055]: SCL Pin: GPIO22 [18:11:32][C][i2c.arduino:056]: Frequency: 50000 Hz [18:11:32][C][i2c.arduino:059]: Recovery: bus successfully recovered [18:11:32][I][i2c.arduino:069]: Results from i2c bus scan: [18:11:32][I][i2c.arduino:075]: Found i2c device at address 0x34 [18:11:32][I][i2c.arduino:075]: Found i2c device at address 0x38 [18:11:32][I][i2c.arduino:075]: Found i2c device at address 0x51 [18:11:32][I][i2c.arduino:075]: Found i2c device at address 0x68 [18:11:32][C][spi:101]: SPI bus: [18:11:32][C][spi:102]: CLK Pin: GPIO18 [18:11:32][C][spi:103]: MISO Pin: GPIO38 [18:11:32][C][spi:104]: MOSI Pin: GPIO23 [18:11:32][C][spi:106]: Using HW SPI: YES [18:11:32][C][ili9xxx:047]: ili9xxx [18:11:32][C][ili9xxx:047]: Rotations: 0 ° [18:11:32][C][ili9xxx:047]: Dimensions: 320px x 240px [18:11:32][C][ili9xxx:053]: Color mode: 16bit [18:11:32][C][ili9xxx:064]: DC Pin: GPIO15 [18:11:32][C][ili9xxx:070]: Update Interval: 1.0s [18:11:32][C][uptime.sensor:031]: Uptime Sensor 'Uptime' [18:11:32][C][uptime.sensor:031]: Device Class: 'duration' [18:11:32][C][uptime.sensor:031]: State Class: 'total_increasing' [18:11:32][C][uptime.sensor:031]: Unit of Measurement: 's' [18:11:32][C][uptime.sensor:031]: Accuracy Decimals: 0 [18:11:32][C][uptime.sensor:031]: Icon: 'mdi:timer-outline' [18:11:32][C][FT63X6Touchscreen:141]: FT63X6 Touchscreen: [18:11:32][C][FT63X6Touchscreen:142]: Address: 0x38 [18:11:32][C][qr_code:012]: QR code: [18:11:32][C][qr_code:013]: Value: 'ESPHome Web c472e8 Core2' [18:11:32][C][axp192.sensor:016]: AXP192: [18:11:32][C][axp192.sensor:017]: Address: 0x34 [18:11:32][C][axp192.sensor:018]: Battery Level 'Battery Level' [18:11:32][C][axp192.sensor:018]: State Class: '' [18:11:32][C][axp192.sensor:018]: Unit of Measurement: '%' [18:11:32][C][axp192.sensor:018]: Accuracy Decimals: 1 [18:11:32][C][axp192.sensor:018]: Icon: 'mdi:battery' [18:11:32][C][mpu6886:091]: MPU6886: [18:11:32][C][mpu6886:092]: Address: 0x68 [18:11:32][C][mpu6886:096]: Update Interval: 60.0s [18:11:32][C][homeassistant.time:010]: Home Assistant Time: [18:11:32][C][homeassistant.time:011]: Timezone: 'JST-9' [18:11:32][C][psram:020]: PSRAM: [18:11:32][C][psram:021]: Available: YES [18:11:32][C][psram:024]: Size: 3 MB [18:11:32][C][captive_portal:088]: Captive Portal: [18:11:32][C][mdns:108]: mDNS: [18:11:32][C][mdns:109]: Hostname: esphome-web-c472e8 [18:11:33][C][ota:093]: Over-The-Air Updates: [18:11:33][C][ota:094]: Address: esphome-web-c472e8.local:3232 [18:11:33][C][ota:097]: Using Password. [18:11:33][C][api:138]: API Server: [18:11:33][C][api:139]: Address: esphome-web-c472e8.local:6053 [18:11:33][C][api:141]: Using noise encryption: YES [18:11:33][C][wifi_signal.sensor:009]: WiFi Signal 'WiFi Signal' [18:11:33][C][wifi_signal.sensor:009]: Device Class: 'signal_strength' [18:11:33][C][wifi_signal.sensor:009]: State Class: 'measurement' [18:11:33][C][wifi_signal.sensor:009]: Unit of Measurement: 'dBm' [18:11:33][C][wifi_signal.sensor:009]: Accuracy Decimals: 0 [18:11:33][C][[audio:190]]: Audio: [18:11:52][D][axp192.sensor:031]: Got Battery Level=106.572716 (4.172300) [18:11:52][D][sensor:110]: 'Battery Level': Sending state 100.00000 % with 1 decimals of accuracy [18:12:01][D][sensor:110]: 'WiFi Signal': Sending state -49.00000 dBm with 0 decimals of accuracy [18:12:12][D][sensor:110]: 'Uptime': Sending state 51.08600 s with 0 decimals of accuracy [18:12:19][D][mpu6886:128]: Got accel={x=-0.139 m/s², y=-0.196 m/s², z=10.557 m/s²}, gyro={x=-17.988 °/s, y=-7.012 °/s, z=6.463 °/s}, temp=39.394°C [18:12:22][D][axp192.sensor:031]: Got Battery Level=106.672722 (4.173400) [18:12:22][D][sensor:110]: 'Battery Level': Sending state 100.00000 % with 1 decimals of accuracy [18:12:52][D][axp192.sensor:031]: Got Battery Level=106.572716 (4.172300) [18:12:52][D][sensor:110]: 'Battery Level': Sending state 100.00000 % with 1 decimals of accuracy [18:13:01][D][sensor:110]: 'WiFi Signal': Sending state -49.00000 dBm with 0 decimals of accuracy [18:13:12][D][sensor:110]: 'Uptime': Sending state 111.08600 s with 0 decimals of accuracy [18:13:19][D][mpu6886:128]: Got accel={x=-0.144 m/s², y=-0.199 m/s², z=10.600 m/s²}, gyro={x=-19.085 °/s, y=-7.317 °/s, z=6.280 °/s}, temp=35.624°C [18:13:22][D][axp192.sensor:031]: Got Battery Level=106.672722 (4.173400) [18:13:22][D][sensor:110]: 'Battery Level': Sending state 100.00000 % with 1 decimals of accuracy [18:13:52][D][axp192.sensor:031]: Got Battery Level=106.672722 (4.173400) [18:13:52][D][sensor:110]: 'Battery Level': Sending state 100.00000 % with 1 decimals of accuracy [18:14:01][D][sensor:110]: 'WiFi Signal': Sending state -49.00000 dBm with 0 decimals of accuracy [18:14:12][D][sensor:110]: 'Uptime': Sending state 171.08701 s with 0 decimals of accuracy [18:14:19][D][mpu6886:128]: Got accel={x=-0.151 m/s², y=-0.196 m/s², z=10.615 m/s²}, gyro={x=-19.939 °/s, y=-7.988 °/s, z=8.110 °/s}, temp=46.836°C [18:14:22][D][axp192.sensor:031]: Got Battery Level=106.472710 (4.171200) [18:14:22][D][sensor:110]: 'Battery Level': Sending state 100.00000 % with 1 decimals of accuracy [18:14:52][D][axp192.sensor:031]: Got Battery Level=106.572716 (4.172300) [18:14:52][D][sensor:110]: 'Battery Level': Sending state 100.00000 % with 1 decimals of accuracy [18:15:01][D][sensor:110]: 'WiFi Signal': Sending state -50.00000 dBm with 0 decimals of accuracy [18:15:12][D][sensor:110]: 'Uptime': Sending state 231.08600 s with 0 decimals of accuracy [18:15:19][D][mpu6886:128]: Got accel={x=-0.175 m/s², y=-0.213 m/s², z=10.655 m/s²}, gyro={x=-16.951 °/s, y=-7.134 °/s, z=5.427 °/s}, temp=54.474°C「「「あ |
[[audio:190]] という2重かっこの部分は、実際には、かっこは1重である。WordPressのこの部分がショートコードとして解釈されてしまうため、2重に変更している。
余談だが、ESPHomeで表示されているログをコピペして貼り付けたら、自動で SSIDや BASSID が[retracted]に変換されている。よくできている。